Straight base petticoat method
Cut a 1.75-metre length of 1–1.5 centimetre-wide cotton tape and thread it through the waist channel. Pull it tightly to fit the waist of the bust form. Decide on the hem circumference of the petticoat and cut two lengths of cotton-covered petticoat steel the finished circumference plus 15 centimetres. Insert the steels into the two channels at the bottom of the petticoat, allowing the 15 centimetres extra to extend inside the opposite end of the channel, forming an overlap. The steels can be overlapped more if a narrower skirt is needed. Secure the circumference by stitching the cotton covering the steels to itself in the centre of the overlap. Adjust the steels so that the centre back seam in the calico is in the centre of the overlap. Tip: It is a good idea to have the upper steel pulled about 1 centimetre tighter than the hem steel. This will prevent it from being seen as a ridge under the garment skirt.
Evenly distribute any gathers in the calico around the steels and over the overlap. Depending on the profile of the garment skirt, the overlapping steels can either be placed at the centre front or centre back of the skirt. If your skirt is very flat across the front, moving the overlap to the front will give a flatter front as the steel does not bend so easily where it is double. This can be achieved by sliding the overlap inside the channel to the front. Pulling the gathers over the steels closer together will also flatten the profile. This basic construction method is very versatile and can be easily adapted to different sized bust forms or mannequins by increasing the amount of fabric in the width and using longer petticoat steels.
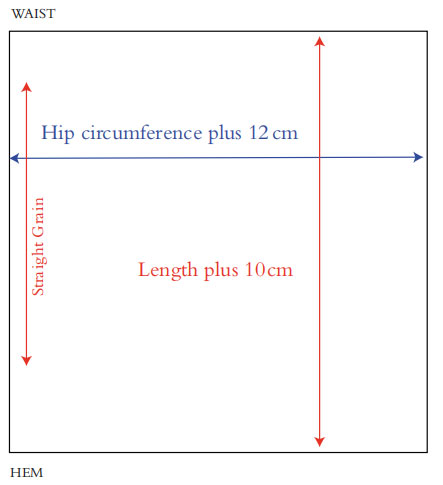
CUTTING METHOD FOR A STRAIGHT BASE PETTICOAT

Figure 8.7a Cutting a straight base petticoat (not to scale). © Author.
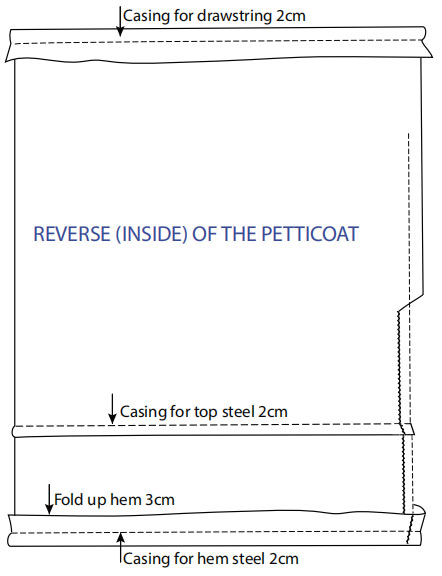
STITCHING METHOD FOR A STRAIGHT BASE PETTICOAT

Figure 8.7b Stitching a straight base petticoat (not to scale). © Author.
A-line base petticoat
Cut out the A-line pattern pieces in medium-weight calico. Join the side and centre back seams, if your pattern has one, leaving one seam open 20 centimetres at the waist. Press the seams open and zigzag stitch all seam allowances flat. The channels for the steels and drawstring are then made following the method used for the straight base petticoat.
There may be excess fabric when stitching the casings due to the A-line shape of the skirt panels. Any excess fabric is gently eased into the seams and will not be visible when the steels and drawstring are inserted and tightened.
Net petticoats
Gathered net petticoats are used over the base petticoat to refine the shape of the silhouette. Several layers of gathered net may be needed to create the desired shape. Even when using a wide crinoline-type base petticoat with many rows of steels it is advisable to use a simple gathered net petticoat over the top (see figure 8.13). This will prevent the garment skirt from sagging between the rows of petticoat steels and developing a corrugated effect whilst on display.
Polyester petticoat net is available in varying stiffnesses. A net of medium stiffness works well. If the net is too stiff it is more difficult to gather and can create bumps visible through the garment skirt. If several layers of net are needed for a very full skirt use a stiffer net for the underneath layers with a softer net over the top to smooth the surface. Very soft net is not advisable for petticoats unless the garment is very delicate, as it will not hold its shape over time. However, it can be added to arms to give fullness inside wide sleeves.
Although net does not have a grain line as such, it will hang differently depending on the direction in which it is cut. The most subtle skirt profiles can be achieved by cutting lengths of net parallel to the sides of the roll or bolt and gathering across the width. Gathering the net down the sides of the roll gives a bouncier finish that does not hang so well. Even for a very full skirt requiring several widths of net it is better to cut the lengths of net parallel to the sides of the roll, stitch them together and then gather across the width, the shorter length of the holes.
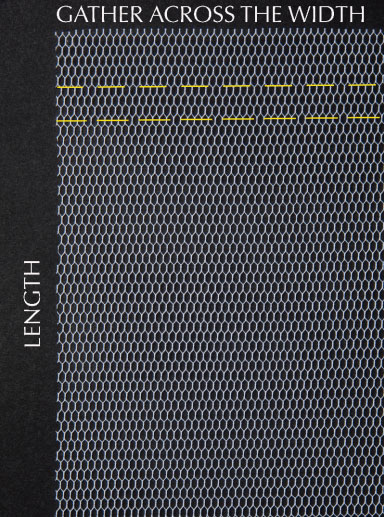
Two rows of machine gathering stitches work best. Set the sewing machine to a wide stitch (at least 4) and use a strong thread and a loose tension.
This process can be speeded up by ruching the net (pushing the net into small pleats) as it is fed under the sewing machine foot.
The ratio of the gathers on each section of net is also an important factor as this will affect the silhouette. For the two-tier skirt (see figure 8.9) the top tier is 1.5 widths of net and the lower frill at the hem is three widths giving a ratio of 2:1.

Figure 8.8 Sample of petticoat net showing two rows of gathering across the top at the waist position. © Author. Photography by Peter Greenland.
The two-tier skirt with the deeper bottom frill (see figure 8.10) is also gathered at a ratio of 2:1 but the deeper frill gives a completely different silhouette. The five-tiered skirt (see figure 8.12) has a much lower ratio of 1.5:1. Having more tiers but fewer gathers in each tier creates a gentler, more fluid shape. An even subtler effect can be achieved by using a slightly softer net. This would work well under a delicate flowing skirt. Even for under a very full skirt, a maximum gathering ratio of 3:1 should be sufficient. A better solution for a garment with a wide skirt would be to use a wider A-line base petticoat with two petticoat steels at the hem and attaching a 25–30-centimetre net frill directly to the base petticoat about 5–10 centimetres above the top steel and reaching to the hem.