Storyboards and Silhouettes
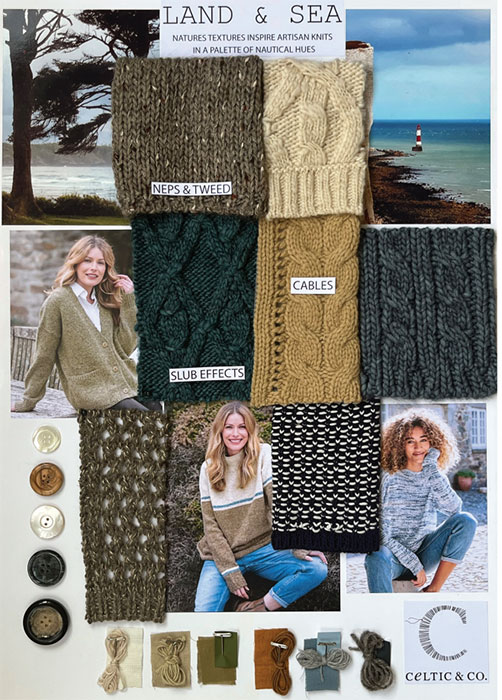
This chapter explains how you can adapt a technique used by designers today to give a visual overview of garment styles relating to a specific date. Designers use ‘storyboards’ or ‘mood boards’, to create the ‘atmosphere’ or express a ‘theme’ when designing garments for a new collection. When used in reference to historic dress, storyboards can provide an overview of the most common design features associated with a garment of a particular date. Having chosen your images from the sources introduced in Chapter 2, a good way to analyse the information and refine the date is to create a storyboard.
Starting with images of garments selected over a date range of say ten to twenty years, it should be possible, by a process of elimination, to reduce the date to within five years, or in some cases less. In the eighteenth century a twenty-year period may be needed but in the nineteenth century, as innovations in garment technology speeded production, a ten-year period should be sufficient.
Although some fashions changed quickly, by starting with a broad date range and methodically comparing all of the design details seen in each image it should be possible to considerably narrow the date range of the garment under investigation. Photographs of portrait paintings, museum postcards, museums’ online image catalogues, images in dress history books, and historic photographs can all be accessed for personal research.1 Some features seen in the images may be identical to the garment being studied but others will be significantly different. For instance, the bodice may be correct but the skirt is too short or too wide; the bodice may be almost correct but the waist is too high; the bodice and skirt are correct but the sleeves are the wrong shape. Every component of a garment is an important indicator when determining its place in fashion history and, by studying all the design elements, style trends relating to a particular date will begin to emerge.

Figure 4.1 Mood board designed by knitwear designer, Angela Wood. Images courtesy of Celtic & Co.
When reviewing the images, it is good to develop a system for analysing the information in them. For a dress, start with the bodice and work down the body to the hem of the skirt. The following format highlights essential information that you will need to discover. Each part of the garment can be checked against the images in the storyboard and, by a process of elimination, eventually the majority of the characteristics will match with one of the dated images. A good way to ensure important details are not missed is to have a series of questions to answer.
Garment analysis questions:
• How long is the bodice: does it extend to the waist or the hips?
• Where is the bust line and how does it relate to the position of the waist?
• What shape is the skirt and how long is it?
• Would the skirt have needed a hoop petticoat or a bustle?
° If yes, what type of bustle would it have been?
• What is the width of the shoulders, narrow or wide? Square or sloping?
• What is the shape and size of the sleeves?
How to use storyboards to date a garment
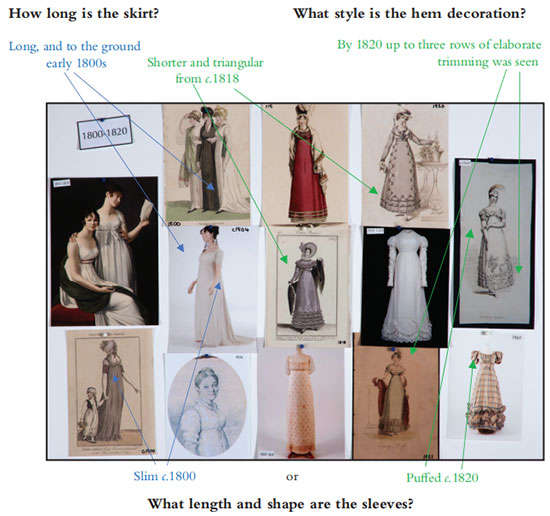
The following example covers the years from 1800 to 1820. There was a definite progression in style from the neoclassical elegance of 1800–10 with its diaphanous, columnar dresses to the more tailored styles post-1810 with fitted bodices and shorter, wider, triangular skirts. In the early 1800s bodices were very short and unstructured with gathering, drawstrings and pins creating the fit. By 1820 bodices were longer with seams and darts controlling the shape. At the beginning of the century skirts fell straight to the floor at the front and often trailed along the ground at the back. By 1820 skirts were shorter with the feet and shoes visible below the hem of the dress.
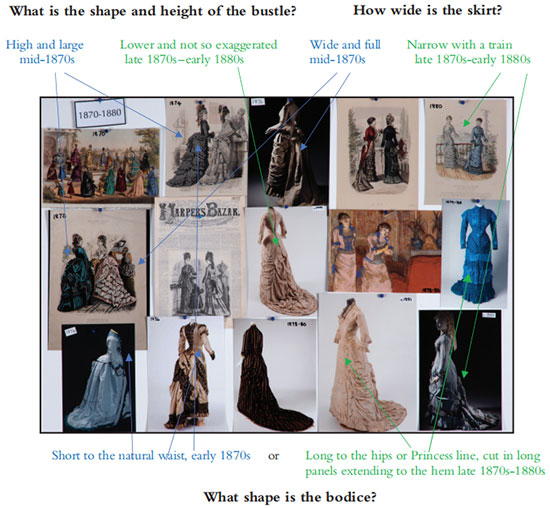
The second example is for styles from c.1870 to 1880. In 1870, skirts were high, full and draped over a bustle at the back. Between 1875 and 1880 bodices were generally tight fitting through the waist and over the hips and it was the silhouette of the skirts which was the key element when establishing the date that a garment was worn. During the late 1870s the hip profile was in a state of change as the bustle declined and skirts became narrower. During this period the size of the hips can be a good indicator of date of manufacture. A larger hip measurement could mean an earlier date when the dress was worn over a large bustle petticoat. A smaller hip circumference and narrow skirt would indicate a later date when the bustle was in decline. For both examples comparing the details found in the garment to be displayed with the features seen in the images on the storyboard will help to establish the date the style was worn.
When the date is decided you can remove the irrelevant images and build up the story of the garment by adding images of the appropriate underwear for the time. If there is an image of a similar garment in action, either in a painting or photograph, this could be useful to capture the posture or ‘attitude’ of the person when the garment was worn.

Figure 4.2 Storyboard showing the evolution in the shape of sleeves and skirts from 1800 to the 1820s. © Author. Please see pages 165–167 for credits for individual images.

Figure 4.3 Storyboard showing how the bodice lengthened and the bustle lowered from 1870–80. © Author. See pages 168–170 for individual image credits.