STITCHING
1. Zigzag stitch the cut edges along the top and at either end of the length of calico to secure the edges and prevent them from fraying.
2. Turn up 3-centimetre hem along the selvedge and machine stitch a 2-centimetre channel for the steel at the bottom of the petticoat. On the inside of the petticoat (the same side as the seam allowance on the hem) pin and machine stitch the four tucks for the other steels.
3. Check the finished length and turn over the excess fabric at the waist to the inside of the petticoat; the same side as the tucks.
4. Stitch a 2-centimetre channel parallel to the folded top edge for the drawstring casing.
5. Insert the drawstring tape into the casing.
6. Insert the steels into the hem and the four tucks and overlap the ends 20 centimetres. This will be the front of the skirt. Where the steels overlap will create a flatter shape across the front.
7. Bring the edges of the petticoat together at the centre front and distribute the gathering evenly over the steels all round the petticoat (see figure 8.18 and 8.19).
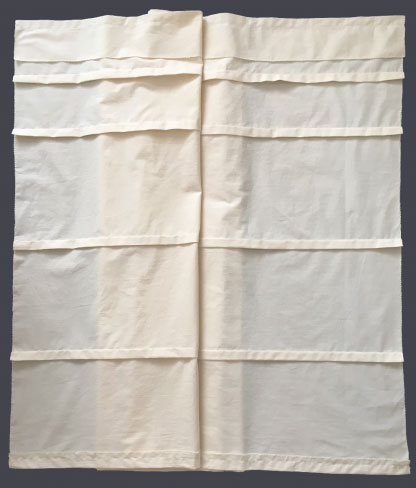
Figure 8.17 Calico showing the stitched waist casing, tucks and hem on the inside of the petticoat. © Author.
Replica hoop petticoats
Making a replica hoop petticoat can take many hours but it may be possible to create a simpler hooped petticoat based on the ‘Universal Petticoat’ that will give the correct skirt profile but is easier and quicker to make than an exact replica (see figure 8.20).
The steels can be pulled in or let out to subtly control the petticoat silhouette. A wide, dome-shaped skirt will need more rows of steel closer together between the waist and the hips to create a gradual curved profile. A wide triangular skirt will need more evenly spaced rows from the waist to the hem.
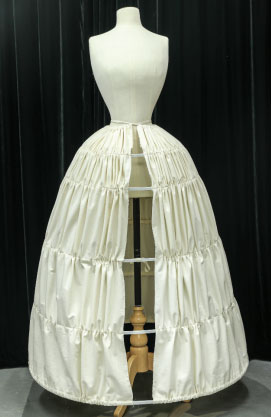
Figure 8.18 New Universal petticoat showing the petticoat steels inserted into the tucks inside the skirt. The front edges of the calico are brought together when the steels have been adjusted to the correct circumference. The steels are overlapped at the front to give a flatter effect. © Author. Photography Janie Lightfoot.
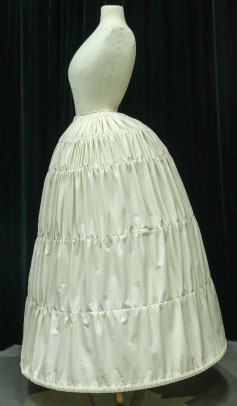
Figure 8.19 Having more gathers over the steels at the front flattens the front profile of the petticoat and pushes the steels out at the back. Tapes can be stitched inside to the bottom steel and the one above at the front and tied around the bust form pole to further flatten the front and push out the back. © Author. Photography Janie Lightfoot.
Eighteenth-century wide hoop or pannier petticoat
A wide hoop petticoat can also be created from the New Universal petticoat. Inserting cotton tapes inside the steels to pull them together from front to back will give a wide, flat petticoat suitable for a sack-back dress from the mid-eighteenth century, similar to the dress from the Museum of London dated 1768–80 (see figure 8.22).
For this type of petticoat use a length of calico the circumference of the garment skirt hem plus 30 centimetres. The tucks and hem follow the previous method for a New Universal petticoat but the drawstring is omitted. To give a wide, flat shape the top section is not gathered completely. Only the ends are tightly gathered to give rounded corners. The central sections at the front and back are shaped to fit around the waist, anda waist tape is attached. The top edges either side of the waist are joined front to back with no gathering. You may need to adjust the angle of the top seam between the waist and the gathering at the corners, depending on the angle of the top edge of the skirt.
Tapes are attached inside to each steel casing halfway between the centre front and the sides. Tapes are also attached to the steel casings at the back either side of the centre back in corresponding positions. The tapes on each steel are tied front to back and tightened. It may be necessary to subtly adjust each set of ties until the desired shape is achieved.
An additional wide flat block of conservation foam, Plastazote™4 (see figure 8.24) was used under the top edge of the petticoat to support the weight of the steel hoops and prevent the corners at each side from collapsing. All wide flat hoop petticoats will need an additional rigid structure at the waist to support the weight of the petticoat steels. This could be Plastazote™, metal or acrylic.
A lightly gathered net petticoat was used over the hoop to soften the edges with a final silk habotai petticoat to protect the dress from the net.
For a very wide hoop petticoat like the one used for the Spitalfields’ mantua (see figure 8.1b), the New Universal petticoat cannot be used. A more elaborate shaped petticoat with larger tucks to accommodate wider petticoat steels was needed.
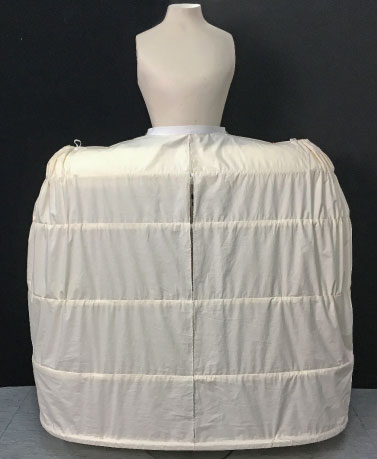
Figure 8.20 Replica wide hoop petticoat for a sack back dress 1768–80. Courtesy of the Museum of London.
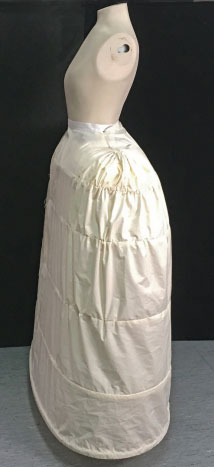
Figure 8.21 Tapes inside attached to the casing at the front and back are used to flatten the skirt silhouette, creating a wide oval shape. Courtesy of the Museum of London.
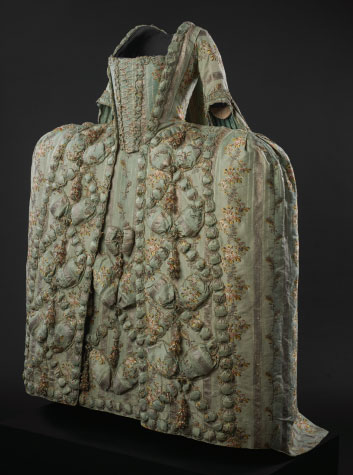
Figure 8.22 Sack-back dress 1768–80 displayed by the Author. © Museum of London.
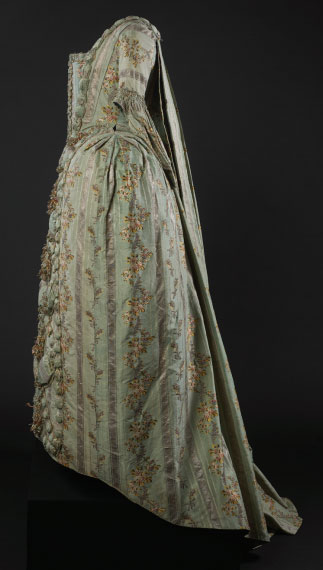
Figure 8.23 Side view showing the narrow front to back width of the skirt. © Museum of London.
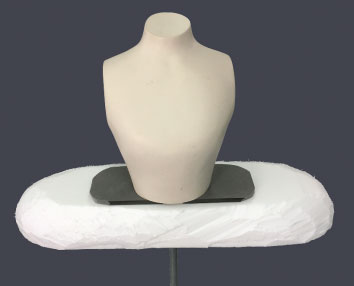
Figure 8.24 Plastazote® support for the top edge of the calico hoop petticoat. Courtesy of the Museum of London.
Top petticoats
The purpose of the final top petticoat is to isolate the net petticoats from the garment and prevent the inside of the garment from catching on the net when it is tried on the
display form. For a garment with a full skirt, having a simple, gathered, lightweight silk habotai top petticoat works well. Under straight skirts, a medium-weight silk habotai works better, as it will hang straighter. Smooth, fine cotton fabrics can also be used. Polyester or microfibre fabrics are also an option but should be used with caution. They should be Oddy tested to ensure that nothing in their manufacture has been added that in the future could degrade and release pollutants that could cause damage to the fabric or trimmings on the garment. This is particularly important if the garment has beading or embroidered decoration with silver or gold threads, as any pollutants could cause metal threads or sequins to tarnish. All fabrics used for top petticoats should be scoured to remove any factory finish, and ironed before use.
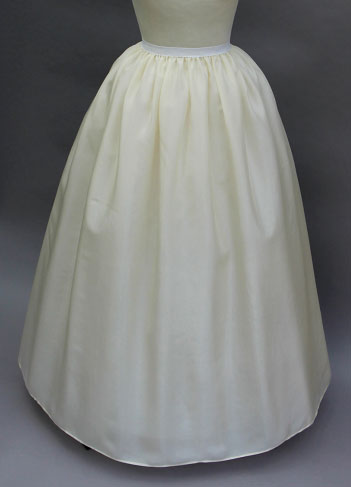
Figure 8.25 Simple silk habotai top petticoat. © Author.
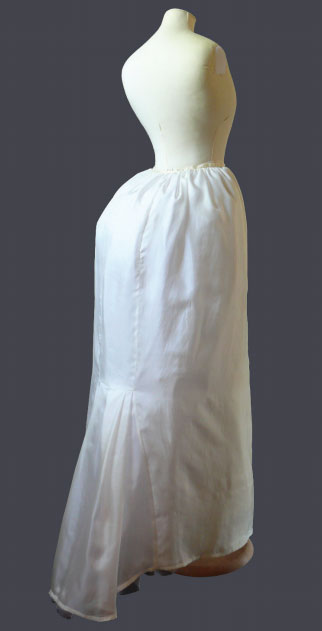
Figure 8.26 Silk habotai top petticoat for a dress from c.1885. The petticoat is shaped to fit over petticoat net added at the centre back to represent a bustle. © Zenzie Tinker Conservation.