If you are purchasing a torso for a fragile garment, often the best way to assess the size of bust form or mannequin required is to make a toile, a simplified replica, of your garment and try it on the proposed figure (see Chapter 7). Trying on fragile historic dress is always difficult and the less you need to handle garments the better. Using a toile greatly reduces the amount of handling needed. If a custom-made figure is to be used, a toile of the garment is essential, as much of the fitting may need to be done in the manufacturer’s workshop, often very dusty with plaster of Paris or fibreglass particles.
Preparing a bust form or mannequin
• Use a measurement chart to record garment measurements and a padding chart to show where wadding needs to be applied to create the appropriate silhouette.
• Do not over-pad the form. Remember the garment will fit around the padding so the measurement over the padding always needs to be smaller than the inside circumference measurements of the garment.
• Adjust the height of the bust form before finally fitting the garment. When fully padded with underpinnings added, a bust form can become very heavy and there is a risk of crushing the garment if you have to adjust the height after it is finally dressed. If using a mannequin with a fixed leg length, make sure the legs are the correct length for the skirt. Contemporary mannequins designed for the fashion industry have long legs and may not work for dress from the eighteenth and early nineteenth centuries. An adaptation to the leg length during manufacture may be needed.
Tools for padding mannequins and bust forms
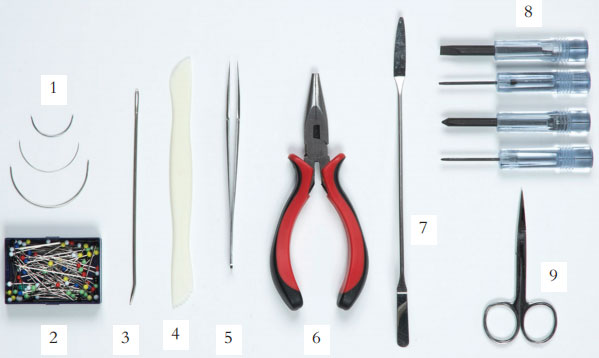
There are no specific tools sold for padding mannequins. A range of tools from many disciplines like dentistry, carpentry, dressmaking and light engineering will all be helpful (see figure 6.6).
1. Curved needles in different sizes (for applying wadding, securing underpinnings and attaching top covers). These are surgical needles and can be purchased from medical suppliers.
2. Glass-headed pins for pinning wadding in place (the glass heads are easy to see and are less likely to be left under subsequent layers of wadding than dressmaker pins).
3. Large bodkin-type needles (useful for lacing corsets with fine cord or thick thread if the original is missing, or for threading tape through waistbands on petticoats).
4. Bone folders (used for smoothing edges and pushing fabrics into small spaces).
5. Tweezers (removing any loose wadding fibres caught on the garment).
6. Small jewellery pliers (to push needles through any areas of the top cover where there is excess adhesive underneath).
7. Spatulas (for ‘final tweaks’ and gently tucking loose fabric edges inside finished displays).
8. Screwdrivers (for adjusting fittings on mannequins).
9. Small sharp scissors (for snipping threads and adjusting any stitching holding the wadding that is too tight).

Figure 6.6 A selection of the more unusual tools that can be very helpful when preparing padded forms for displaying garments. © Author. Photography Peter Greenland.
Applying polyester wadding
The first technique to master when preparing mannequins and bust forms is the application of polyester wadding to customize the shape.
Polyester wadding is available in different weights, widths and thicknesses, known as the ‘loft’. The thickness is often a personal preference or an availability consideration but using a thicker wadding can reduce the number of layers needed to customize the profile of a bust form. Thick wadding can be easily divided into thinner layers by holding the front and back edges and pulling them apart. This is useful when applying the final layer of wadding to smooth out the silhouette. Whatever thickness is used, the wadding should be heat bonded and made without the addition of adhesives.
Bust form
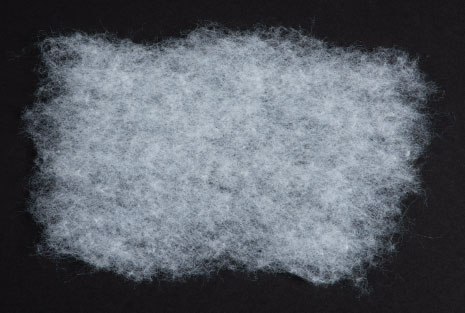
When using a bust form, the most common practice is to cut pieces of wadding and stitch them directly to the outer cover of the form. A more subtle variation of this method is to tear the wadding into appropriately shaped pieces rather than cut it (see figure 6.7). Torn edges are softer and will greatly reduce the chance of creating a stepped effect when multiple layers are added to build the required shape. Also tearing can minimize the need for trimming later and reduce the number of polyester particles in the air.
When wadding is pulled apart the fibres tend to be longer and less likely to be inhaled. However, a face mask should always be worn when working with polyester wadding.

Figure 6.7 Polyester wadding with a torn edge gives a more subtle profile when building up layers to customize the shape of a mannequin or bust form. © Author. Photography Peter Greenland.
Mannequin
When applying wadding to a fibreglass mannequin it will be necessary to first stitch a tight fabric cover around the figure to give a base on to which the wadding can be stitched. Mannequins are smooth and rigid and without a base cover it will be impossible to add wadding effectively. Unbleached and scoured3 cotton jersey stretched tightly around the torso and stitched in place works well. How to make a tight cover is explained later in the chapter.
A simple alternative is to buy a plain un-dyed cotton T-shirt. This too should be scoured before use and the neck bindings and sleeves removed. The T-shirt will need to be several sizes smaller than the mannequin in order to fit as tightly as possible. For womenswear a girl’s T-shirt may be needed and for menswear a teenage boy’s T-shirt, so always check the measurements before purchasing.
Whichever method is used, a tightly fitting base layer is essential when customizing a mannequin. Wadding can then be stitched to the cover to create the required shape, using the method described for a bust form.