Petticoats, Arms and Finishing Touches
Petticoats are never a case of one size or type fits all. Usually, you will need a combination of several types of petticoats to achieve the correct silhouette for your garment. They can be categorized as base petticoats, net petticoats, hooped petticoats and top petticoats. For a garment with sleeves an arm substitute will also be required to complete the overall silhouette.
Base petticoat
When using a bust form on a pole the base petticoat replaces the legs on a full mannequin and prevents additional layers of petticoats from collapsing around the pole. When using a mannequin with legs it gives a foundation for other petticoats. It can be either a straight tube-shape or an A-line shape depending on the hem width of the skirt to be displayed. Two rows of petticoat steel1 are used at the bottom to control its hem circumference. Fabric covered steel tape is available in three widths, 5 mm, 9 mm and 16 mm; 9 mm is best for most petticoats, giving a rigid form but without being too heavy. For wide, flat eighteenth-century hoop petticoats 16 mm will give the best result. Petticoat steel is also available with a plastic covering. This is best avoided unless you can test the coating as it may degrade over time and release chemicals which could be detrimental to historic textiles. The usual test would be the ‘Oddy test’.2 For lighter weight skirts, polyester Rigilene™ boning can be used. However, it is not as robust as petticoat steel and should not be used for a crinoline-type petticoat as it would buckle under the weight of the skirt.
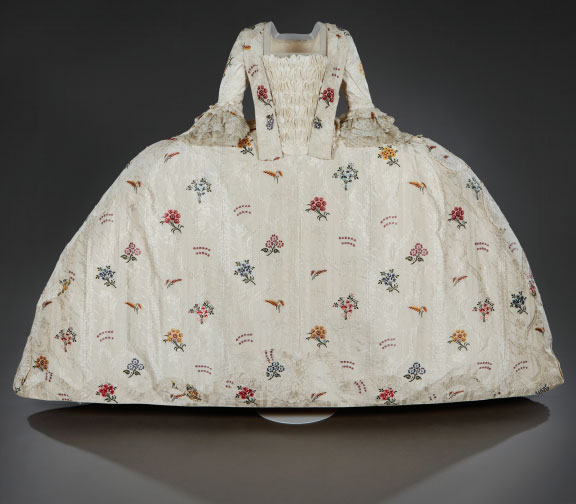
Figure 8.1a Eighteenth-century Spitalfields’ silk mantua. © Historic Royal Palaces. © Photo Claire Collins.
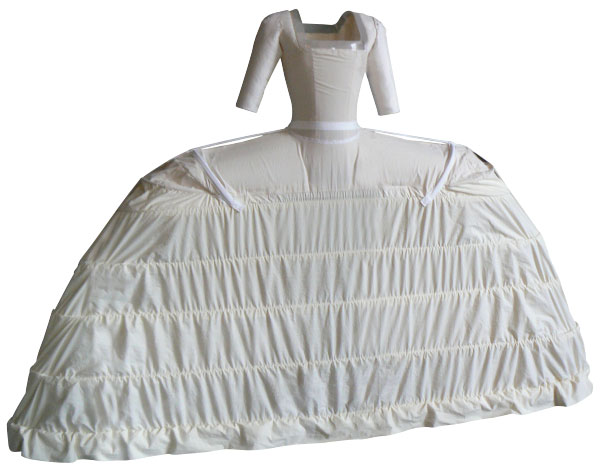
Figure 8.1b Wide hoop petticoat designed by the author for a display at Kensington Palace. © Author. Courtesy of Historic Royal Palaces.
To give full support to skirts, the base petticoat needs to be almost as long as the skirt itself. If the petticoat is too short the hem of the skirt will be unsupported and could fall inwards under the bottom steel. The ideal finished length for a base petticoat would be 2 centimetres shorter than the centre-front waist to hem length of the garment. A base petticoat is usually made from a medium-weight calico,3 scoured to remove any chemicals used in the finishing process.
Changing the position of the straight grain on petticoat panels can subtly change the profile of the petticoat. Figures 8.2 and 8.4 show two types of base petticoats, a straight version and an A-line style cut in striped fabric to show the straight grain. The plain calico straight petticoat (see figure 8.3) shows an adaptation of a straight petticoat for a skirt with a bustle. The front is kept flat and the excess fabric is all taken to the back and either gathered or pleated at the waist. This type of petticoat works well over a bust form with extra padding over the hips at the back (see Chapter 6, figure 6.20). All the petticoats have petticoat steel inserted into the hem and in a tuck inside the petticoat 20 centimetres above the hem.
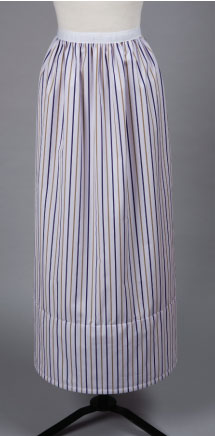
Figure 8.2 Straight base petticoat front view. © Author. Photography by Peter Greenland.
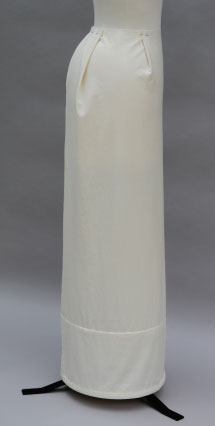
Figure 8.3 Calico straight petticoat adapted for a skirt with a bustle. © Author.
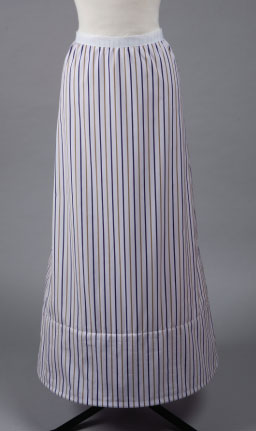
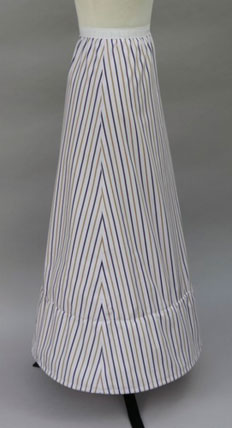
Figure 8.4a and b A-line petticoat with straight grain at the centre front and centre back and bias side seams. © Author. 8.4a Photography by Peter Greenland.
The A-line base petticoat (see figures 8.4 and 8.5) has the straight grain at the centre front and centre back and the side seams on the bias, creating a flat front and back and angled side seams. The pattern is based on a two-piece quarter circle skirt pattern. Contemporary pattern-making books will have instructions for this type of pattern. Flat Pattern Cutting for Fashion, by Helen Stanley, published by Stanley Thornes (p.123) has an example. See Bibliography for details. Alternatively, a commercial pattern for a simple A-line skirt could be used.
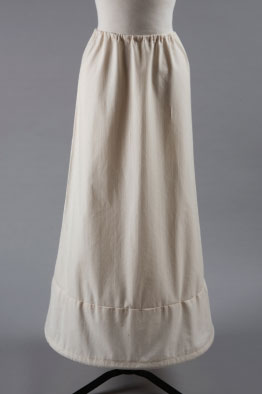
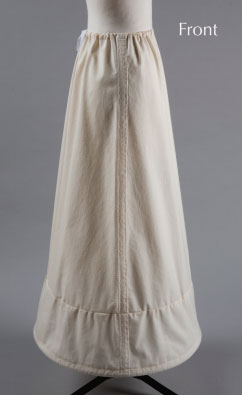
Figure 8.5a and b Calico A-line petticoat with the straight grain at the front and the bias at the sides. © Author. Photography by Peter Greenland.
How an A-line base petticoat falls when worn can be subtly changed by moving the position of the straight grain on the back panel to the sides and having a bias centre back seam. When the bias side seam on the front is joined to the straight side seam on the back it will hang towards the back (see figure 8.6).
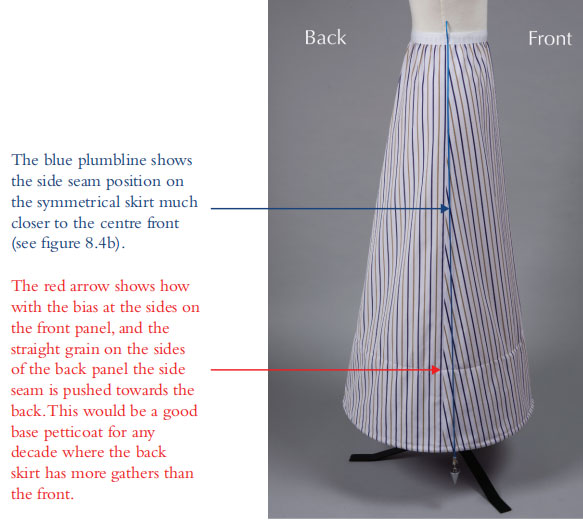
Figure 8.6 A-line base petticoat cut with the straight grain at the centre front and the bias at the centre back. © Author. Photography by Peter Greenland.
Straight base petticoat method
The simplest way to construct a base petticoat with two rows of steel at the hem is to take a piece of calico wide enough to fit easily around the hips of the finished padded bust form or mannequin plus 12 centimetres. Cut the length on the straight grain, long enough to reach from the waist to the hem of the garment, plus 10 centimetres (see figure 8.7a).
Neaten the edges of the calico all round using a zigzag stitch. Join the ends starting 20 centimetres below the top edge to the bottom edge. This will be the seam at the centre back. Press the seam open and zigzag stitch the edges flat from about 35 centimetres above the hem to the bottom edge, including the allowance for the tuck and the hem. This will prevent the steels from catching the seam allowance when they are inserted later.
Fold up a 3-centimetre wide hem on the bottom of the calico and machine stitch 2 centimetres from the fold, leaving a 2.5-centimetre gap over the centre back seam. This will allow a 9 mm petticoat steel to be easily inserted into the channel through the gap. The gap is closed with hand stitching after the steel has been inserted. On the inside of the petticoat, 20 centimetres above the hem, stitch a large tuck 2 centimetres wide (4 centimetres total). Double stitch the tuck over the seam allowance and snip the stitches in the centre back seam inside the tuck to allow the steels to be inserted. Check the length of the petticoat against the garment skirt, ensuring that the finished length is 2 centimetres shorter and fold over any excess fabric at the top to the inside. Stitch a channel 2 centimetres wide for a drawstring along the top edge.